Multi-accounting in Dolphin{anty}: how to avoid bans and make money on the third season of Sandbox
Blog » Multi-accounting in Dolphin{anty}: how to avoid bans and make money on the third season of Sandbox
Sandbox has already announced the release of its third season, which will last for 10 weeks. Crypto rats are gathering information with might and main and are preparing their multi accounts to make money on the popular P2E game.
This season, there will again be 10K of Alfapass rewards, but there will be more than 90 maps. Most importantly, the developers have tightened control and introduced a KYC system. All of this makes life much more difficult for those who are seeking to raise money by playing with 10, 100, or even 1000 accounts.
But it doesn’t matter—below, we will tell you how to use multiple accounts with the help of the Dolphin{anty} antidetect browser and other software in order to increase your chances of success and minimize the risk of account bans.
A step-by-step guide to multi-accounting in Sandbox 👌
Step 1. Create a table of the following type
We recommend to put the Metamask data in another table, to which only you will have access, to keep it safe. By using this table, it is much more convenient to navigate a variety of accounts and logs and to know what belongs to what.
Step 2. Buy proxies
Personal anonymous proxies are best suited here. So, we buy proxies and enter their addresses, logins, and passwords into the table.
Step 3. Download Dolphin{anty} anti-detect browser
Download Dolphin{anty} from the official site. This version already has 10 free browser profiles.
Step 4. Register Sandbox accounts through the Dolphin{anty} anti-detect browser
Register accounts on the Sandbox website through the Dolphin{anty} anti-detect browser. You can register in Sandbox via mail, X, Metamask wallet, etc.—it’s up to you. In any case, the step-by-step process is as follows:
- Create an account in Dolphin Anty.
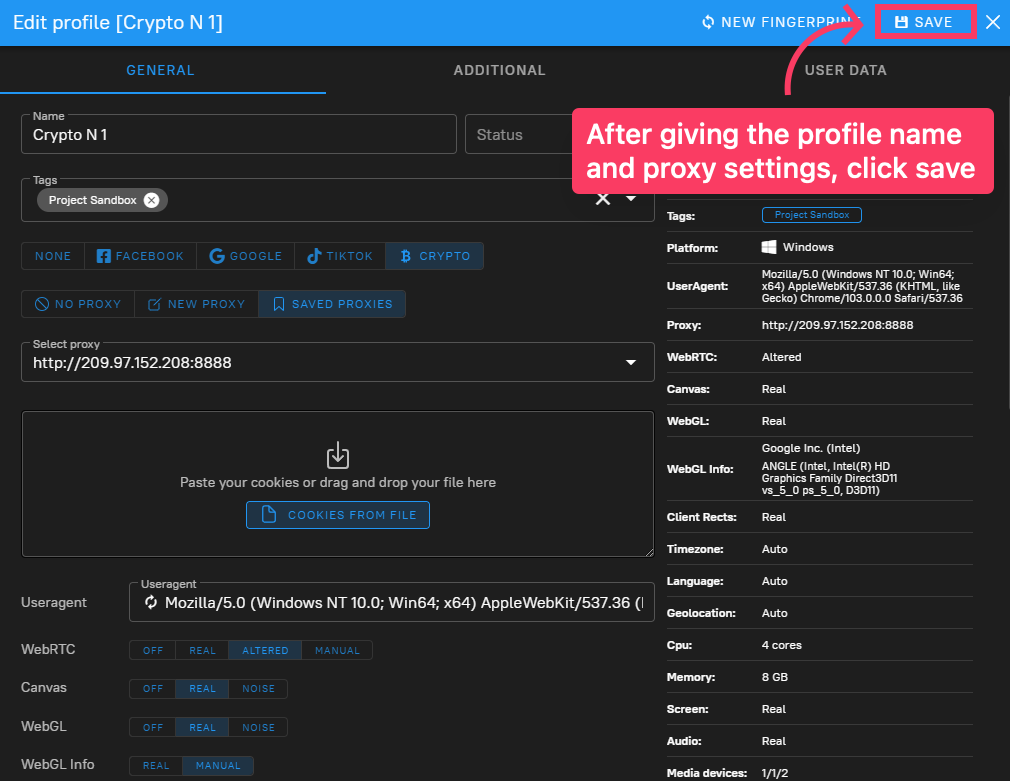
 Set all of the parameters of the browser fingerprint to suit you. You can select the settings of the browser’s fingerprint manually, or leave it in default. But the good old rule says: if you don’t know how to do it better, don’t touch it.
 - Add proxies. Add proxies in the format: address:port:login:password (example: 201.12.555.1.8:8080:realman:Qdf15g4)
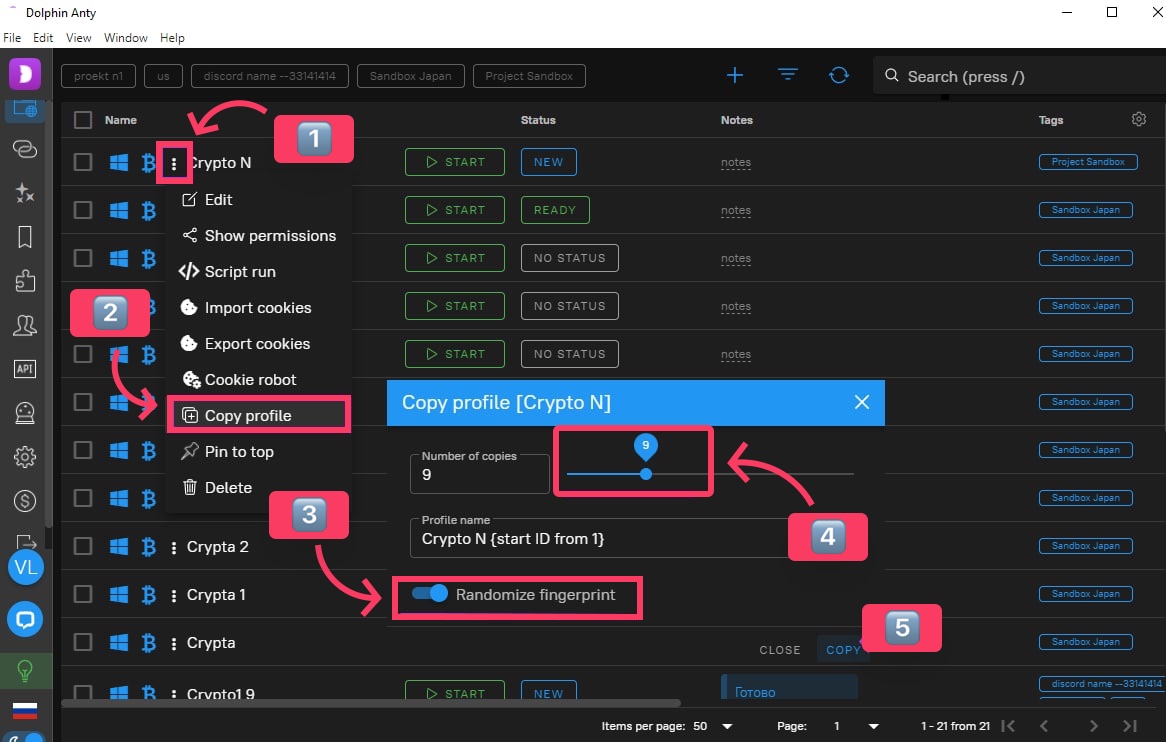
- Copy accounts in a couple of clicks and randomize fingerprints.
 Click on the profile and open the dropdown menu, choose the “copy profile” option and enter the number of profiles you need. You will get brand-new unique profiles in seconds.
 - Add proxy to each profile. This can be done on the right-hand side of the anti-detect browser interface.
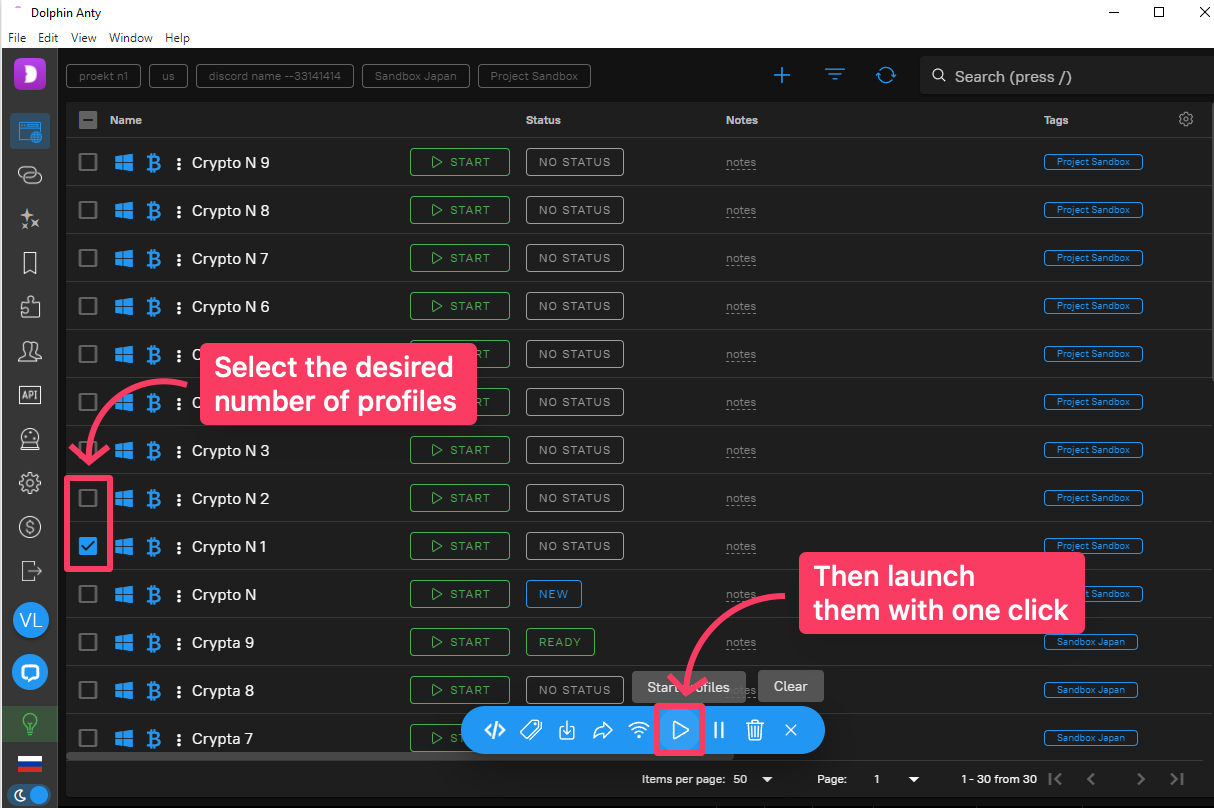
- Launch browser profile(s). This can be done by clicking on the “Start” button. The new profile will open in a new window. Then, everything works just like it does in a regular browser. Install the Metamask wallet into the profile. You can immediately install Metamask wallets on all of your created profiles one by one, if you plan to register in Sandbox via Metamask.

- Go to the Sandbox website and register.
- Close the profile in antidetect-browser. All mail data, login/Metamask, proxies will be saved in your account. All that remains to do is to press the “Start” button when one of the profiles with an account is required.
- Go to the next profile, repeat the registration process in Sandbox.
Step 5. Change the UUID (GUID) of your PC
You’ll need to change the UUID of your device to avoid a ban on your hardware parameters. If the game was browser-based, we would just need a browser anti-detection, but since Sandbox has its own application, we have to do additional steps.

In the command line, we drive in the word “Regedit” and go to the Registry editor program. Find the Cryptography folder. It is located at: Local Machine – Software – Microsoft.

File the MachineGuide. You need to change the “Value data” parameter in it, which looks like d439z4a4-5d04-447f-be1f-3233cd124513. We go to the site: https://www.famkruithof.net/uuid/uuidgen — This is a generator of real UUID numbers.
We select the required number of numbers, generate them, and enter them into the table for each profile so that later, we don’t forget what belongs to what.

Step 6. Change the address of the volume (hard disk)
Now we need to change the address of the volume (hard disk). To do this, we will use the program hard disk serial number changer. Download link.

The volume address looks like this: 2A62-E08C. Change it to any numbers and letters and click “Change.” Put it in the table. We can immediately generate the required number and save it in the table.
Step 7. Change the MAC address
For each profile, you will need to change the MAC address and write it to the table.

We need the SMAC. It is paid, but you can be smart.
The principle of operation is the same: randomize, click “Update MAC,” copy the new addresses to the table. (Address example: 00 10 C6 EE D6 FE).
Step 8. Install the proxy filter
Proxifier — a program that will extend the action of the purchased proxy to the running Sandbox application, allowing you to play under the IP address from which you registered the account through the Dolphin{anty} antidetect.

- Actions in order, left to right, top to bottom.
- Click on “Profile”—add (Add).
- Enter the address and port, select the protocol, add a login and password.
- Click “Advanced”—add a tag to the profile (the name that we indicated in the table)—click “OK”.
- Again, we find ourselves on the Proxy Server tab—click “Check”—after successful checks, you will be prompted to run the profile—if necessary, run it.
- Click on “File” in the upper left corner and click “Save Profile As”—save it under the name that we need, as in the table.
- The saved profile will appear in the downloads folder, from where it can then be loaded.

- Do the same with the rest of the proxies.
Final 🥳
That’s all. Just wait for the release, run your profiles one by one, switch profiles/settings in programs, launch the Sandbox application, play, download levels, and wait for bonuses.
Good luck!


